>>
30-MINUTE MEALS! Get the email series now →


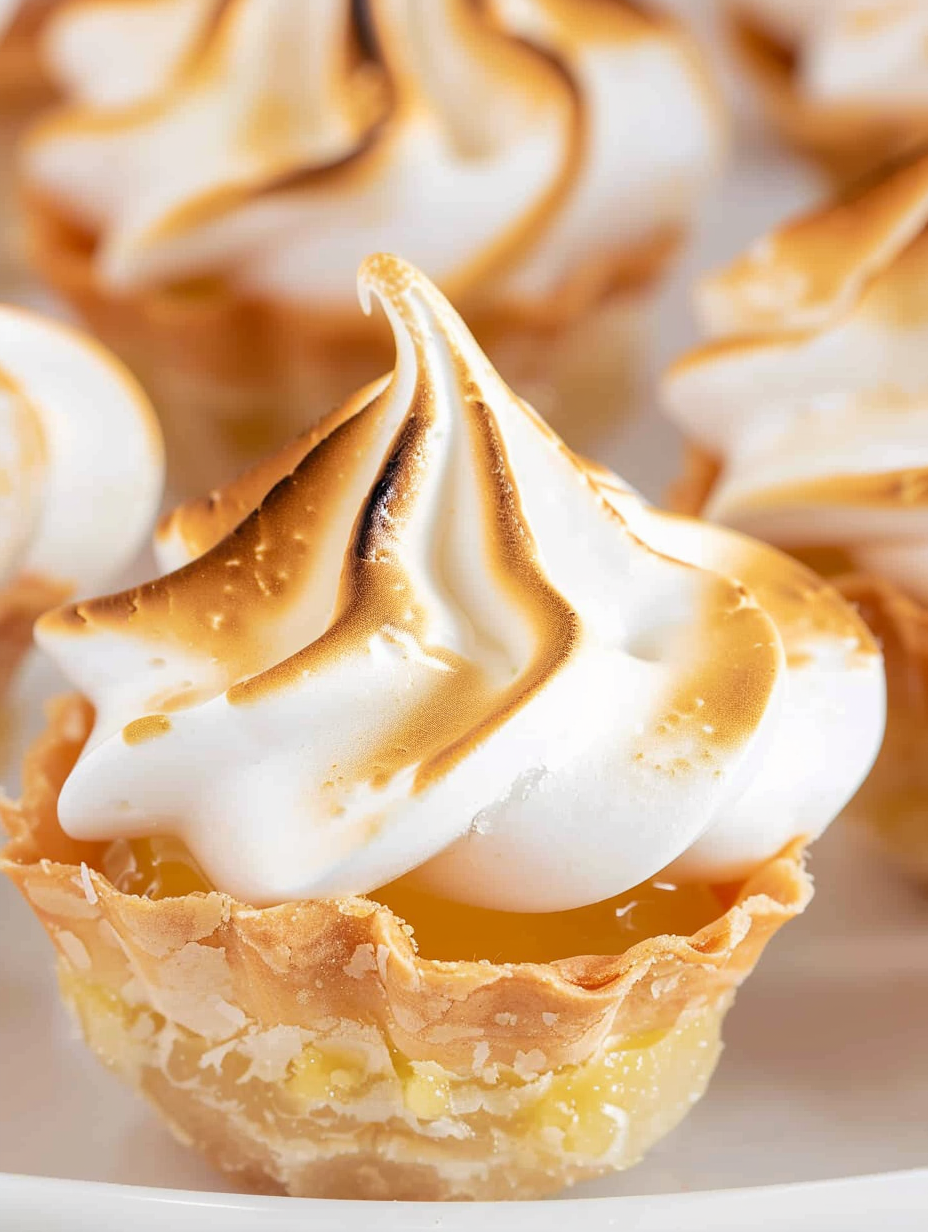
Tiny tartlets with a buttery shell, bright lemon curd, and cloud-like toasted meringue — perfect for parties and make-ahead dessert trays.

This recipe for Mini Lemon Meringue Pies has been a staple for celebrations in my family for years. I first developed this scaled-down version during a summer picnic when I wanted a portable dessert that still felt elegant. The tiny bites deliver everything I love about the classic: a crisp, buttery crust, a tang-forward lemon curd that wakes the palate, and a billowy meringue top that is lightly toasted. Because they are small, each tartlet is just the right balance of sweet and tart, and guests rarely stop at one.
I discovered how well store-bought components can be elevated when combined with a few professional techniques. Using pre-made pie crusts saves time without sacrificing texture when you dock and press them carefully into a mini muffin tin. The lemon curd can be store-bought for convenience — two 10-ounce jars give consistent flavor — while the meringue, whipped to stiff peaks with cream of tartar, adds an impressive finish that browns beautifully under a broiler or kitchen torch. These tartlets are special enough for holidays yet easy enough to whip up for an impromptu gathering.
In my kitchen these tartlets became the highlight of summer gatherings. Family members who typically pass on desserts find themselves reaching for seconds, and I love the ritual of browning each meringue crown, one quick pass under the broiler at a time. The contrast of textures — crisp shell, silky curd, and feather-light meringue — is what makes this tiny dessert feel special.

My favorite part of making these is the final browning step. The caramelized peaks add smoky-sweet complexity that offset the bright lemon. I’ve watched guests close their eyes for a bite and then grin — that moment is worth the small effort. Over the years I’ve learned to time the browning so each tartlet gets an even kiss of color without letting the curd heat through and become runny.
Store filled tartlets in a single layer in an airtight container in the refrigerator for up to 48 to 72 hours; beyond that the tart shell will begin to soften as it absorbs moisture from the curd. If you plan to prepare elements ahead, bake shells up to 3 days in advance and keep them at room temperature in a sealed container. For long-term storage, freeze baked unfilled shells in a freezer-safe bag for up to 3 months; thaw at room temperature and fill immediately before serving. To re-crisp thawed shells, return them to a 350°F oven for 5 minutes on a sheet pan before filling.
If you prefer to make everything from scratch, substitute the pre-made crusts with a basic butter crust made from 1 1/4 cups all-purpose flour, 1/2 teaspoon salt, 8 tablespoons cold unsalted butter, and 3 to 4 tablespoons ice water — pulse in a food processor and chill before rolling. For lemon curd, you can use 6 large egg yolks, 1 cup sugar, 1/2 cup fresh lemon juice, 4 tablespoons unsalted butter, and zest of one lemon cooked over a double boiler until thick. For a lighter topping, try Italian meringue (hot sugar syrup beaten into whites) which is more stable for warm climates.
These miniature tarts shine on dessert platters and pair beautifully with fresh berries, a dusting of powdered sugar, or finely grated lemon zest for extra brightness. Serve with lightly sweetened whipped cream or cool vanilla bean ice cream for contrast. For brunch, place on a tiered stand alongside scones and shortbread. They also work wonderfully after a heavy meal because the citrus cleanses the palate.
In spring and summer, garnish with edible flowers or a small blackberry for color. During the holidays, add a pinch of ginger to the crust or a drizzle of spiced honey for warmth. For winter citrus swaps, try tangerine curd or blood orange curd to vary the flavor profile while keeping the same technique. Cold-weather gatherings benefit from a slightly more caramelized meringue for a toasted, cozy finish.
To streamline assembly, line up stations: one for pressing and baking shells, one for filling using a piping bag, and one for meringue whipping and piping. Bake all shells first, cool, and store; fill and brown the meringue within an hour of serving for best texture. Use a disposable pastry bag to cut cleanup time and keep a small offset spatula handy for smoothing curd if necessary. Label containers with date and contents when prepping ahead.
One summer I brought a batch of these to a neighborhood block party where people rarely mingle over desserts. By the end of the night each tartlet had disappeared and several neighbors asked for the recipe — one even requested a repeat for a baby shower. On another occasion my brother declared these the best lemon tarts he’d ever tasted and kept one in his jacket pocket to savor on the way home, which I took as a sincere compliment and a sign they travel well.
In short, these mini tartlets are an easy way to elevate any gathering. Their combination of texture, flavor, and visual appeal makes them a go-to dessert that you can customize easily. Give them a try and make them your own — small tweaks to the curd or toppings will personalize them for your table.
Bring eggs to room temperature before whipping for greater volume and faster whipping.
Use a piping bag for consistent lemon curd portions; snip a small corner of a Ziploc as an easy alternative.
Avoid overbeating meringue; stop as soon as stiff peaks form to prevent weeping.
This nourishing mini lemon meringue pies recipe is sure to be a staple in your kitchen. Enjoy every moist, high protein slice — it is perfect for breakfast or as a wholesome snack any time.
Yes. You can bake the shells up to 24 hours ahead and store them at room temperature in an airtight container. Fill and top with meringue the day you serve.
Room-temperature egg whites whip faster and to a greater volume than cold whites. Remove eggs from the refrigerator 30 minutes before whipping.
Use a kitchen torch for precise browning or place the tartlets under a preheated broiler for 1 to 2 minutes, watching closely to avoid burning.
This Mini Lemon Meringue Pies recipe makes perfectly juicy, tender, and flavorful steak every time! Serve with potatoes and a side salad for an unforgettable dinner in under 30 minutes.
Remove pie crusts from the refrigerator and let rest at room temperature for 15 minutes to make them easier to roll and shape.
Roll out one crust and use a round cutter slightly larger than muffin cavities. Press cutouts into greased mini muffin tin wells, shaping them to form neat cups.
Bake according to package directions (typically 10-12 minutes) until lightly golden. Cool on a wire rack before removing from the tin and repeat with the second crust.
Pipe or spoon lemon curd into each cooled shell up to the rim. Use a Ziploc bag with the corner snipped for neater filling.
Whip room-temperature egg whites to soft peaks, add cream of tartar, then add sugar a tablespoon at a time while continuing to beat to stiff, glossy peaks (5-10 minutes).
Pipe meringue onto each tartlet. Brown under a preheated broiler for 1-2 minutes or use a kitchen torch for even toasting. Watch carefully to avoid burning.
Last Step: Please leave a rating and comment letting us know how you liked this recipe! This helps our business to thrive and continue providing free, high-quality recipes for you.
Leave a comment & rating below or tag
@royalrecipe on social media!

Easy homemade thin-crust three-cheese spicy chicken and jalapeño pie — a flavor-packed pizza with a satisfying kick, perfect for pizza night or game day.

A bright, creamy BLT pasta salad tossed with basil pesto, fresh greens, cherry tomatoes, and crisp bacon—perfect for warm-weather gatherings and meal prep.

Tender sautéed shrimp tossed with spaghetti and a creamy sweet-spicy bang bang sauce—ready in under 30 minutes for a weeknight favorite.
Leave a comment & rating below or tag @royalrecipe on social media!
Enjoyed this recipe? Share it with friends and family, and don't forget to leave a review!
This recipe looks amazing! Can't wait to try it.
Comments are stored locally in your browser. Server comments are displayed alongside your local comments.
Join to receive our email series which contains a round-up of some of our quick and easy family favorite recipes.
