
Healthy Chocolate Peanut Butter Buster Bars

A quick, no-bake copycat of the Dairy Queen favorite — creamy yogurt and peanut butter frozen bars dipped in chocolate. High-protein, easy, and perfect for a healthy dessert.
This simple frozen treat became a favorite in my kitchen the first summer I wanted something cold, chocolatey, and not a sugar crash. I discovered this combination on a day when my freezer was full of plain yogurt and a jar of peanut butter was waiting to be used. The result — a creamy interior that tastes indulgent but packs over 15 grams of protein per bar — felt like a tiny victory. It reminds me of the Dairy Queen Buster Bar I loved as a teenager, only cleaner and customizable to dietary needs.
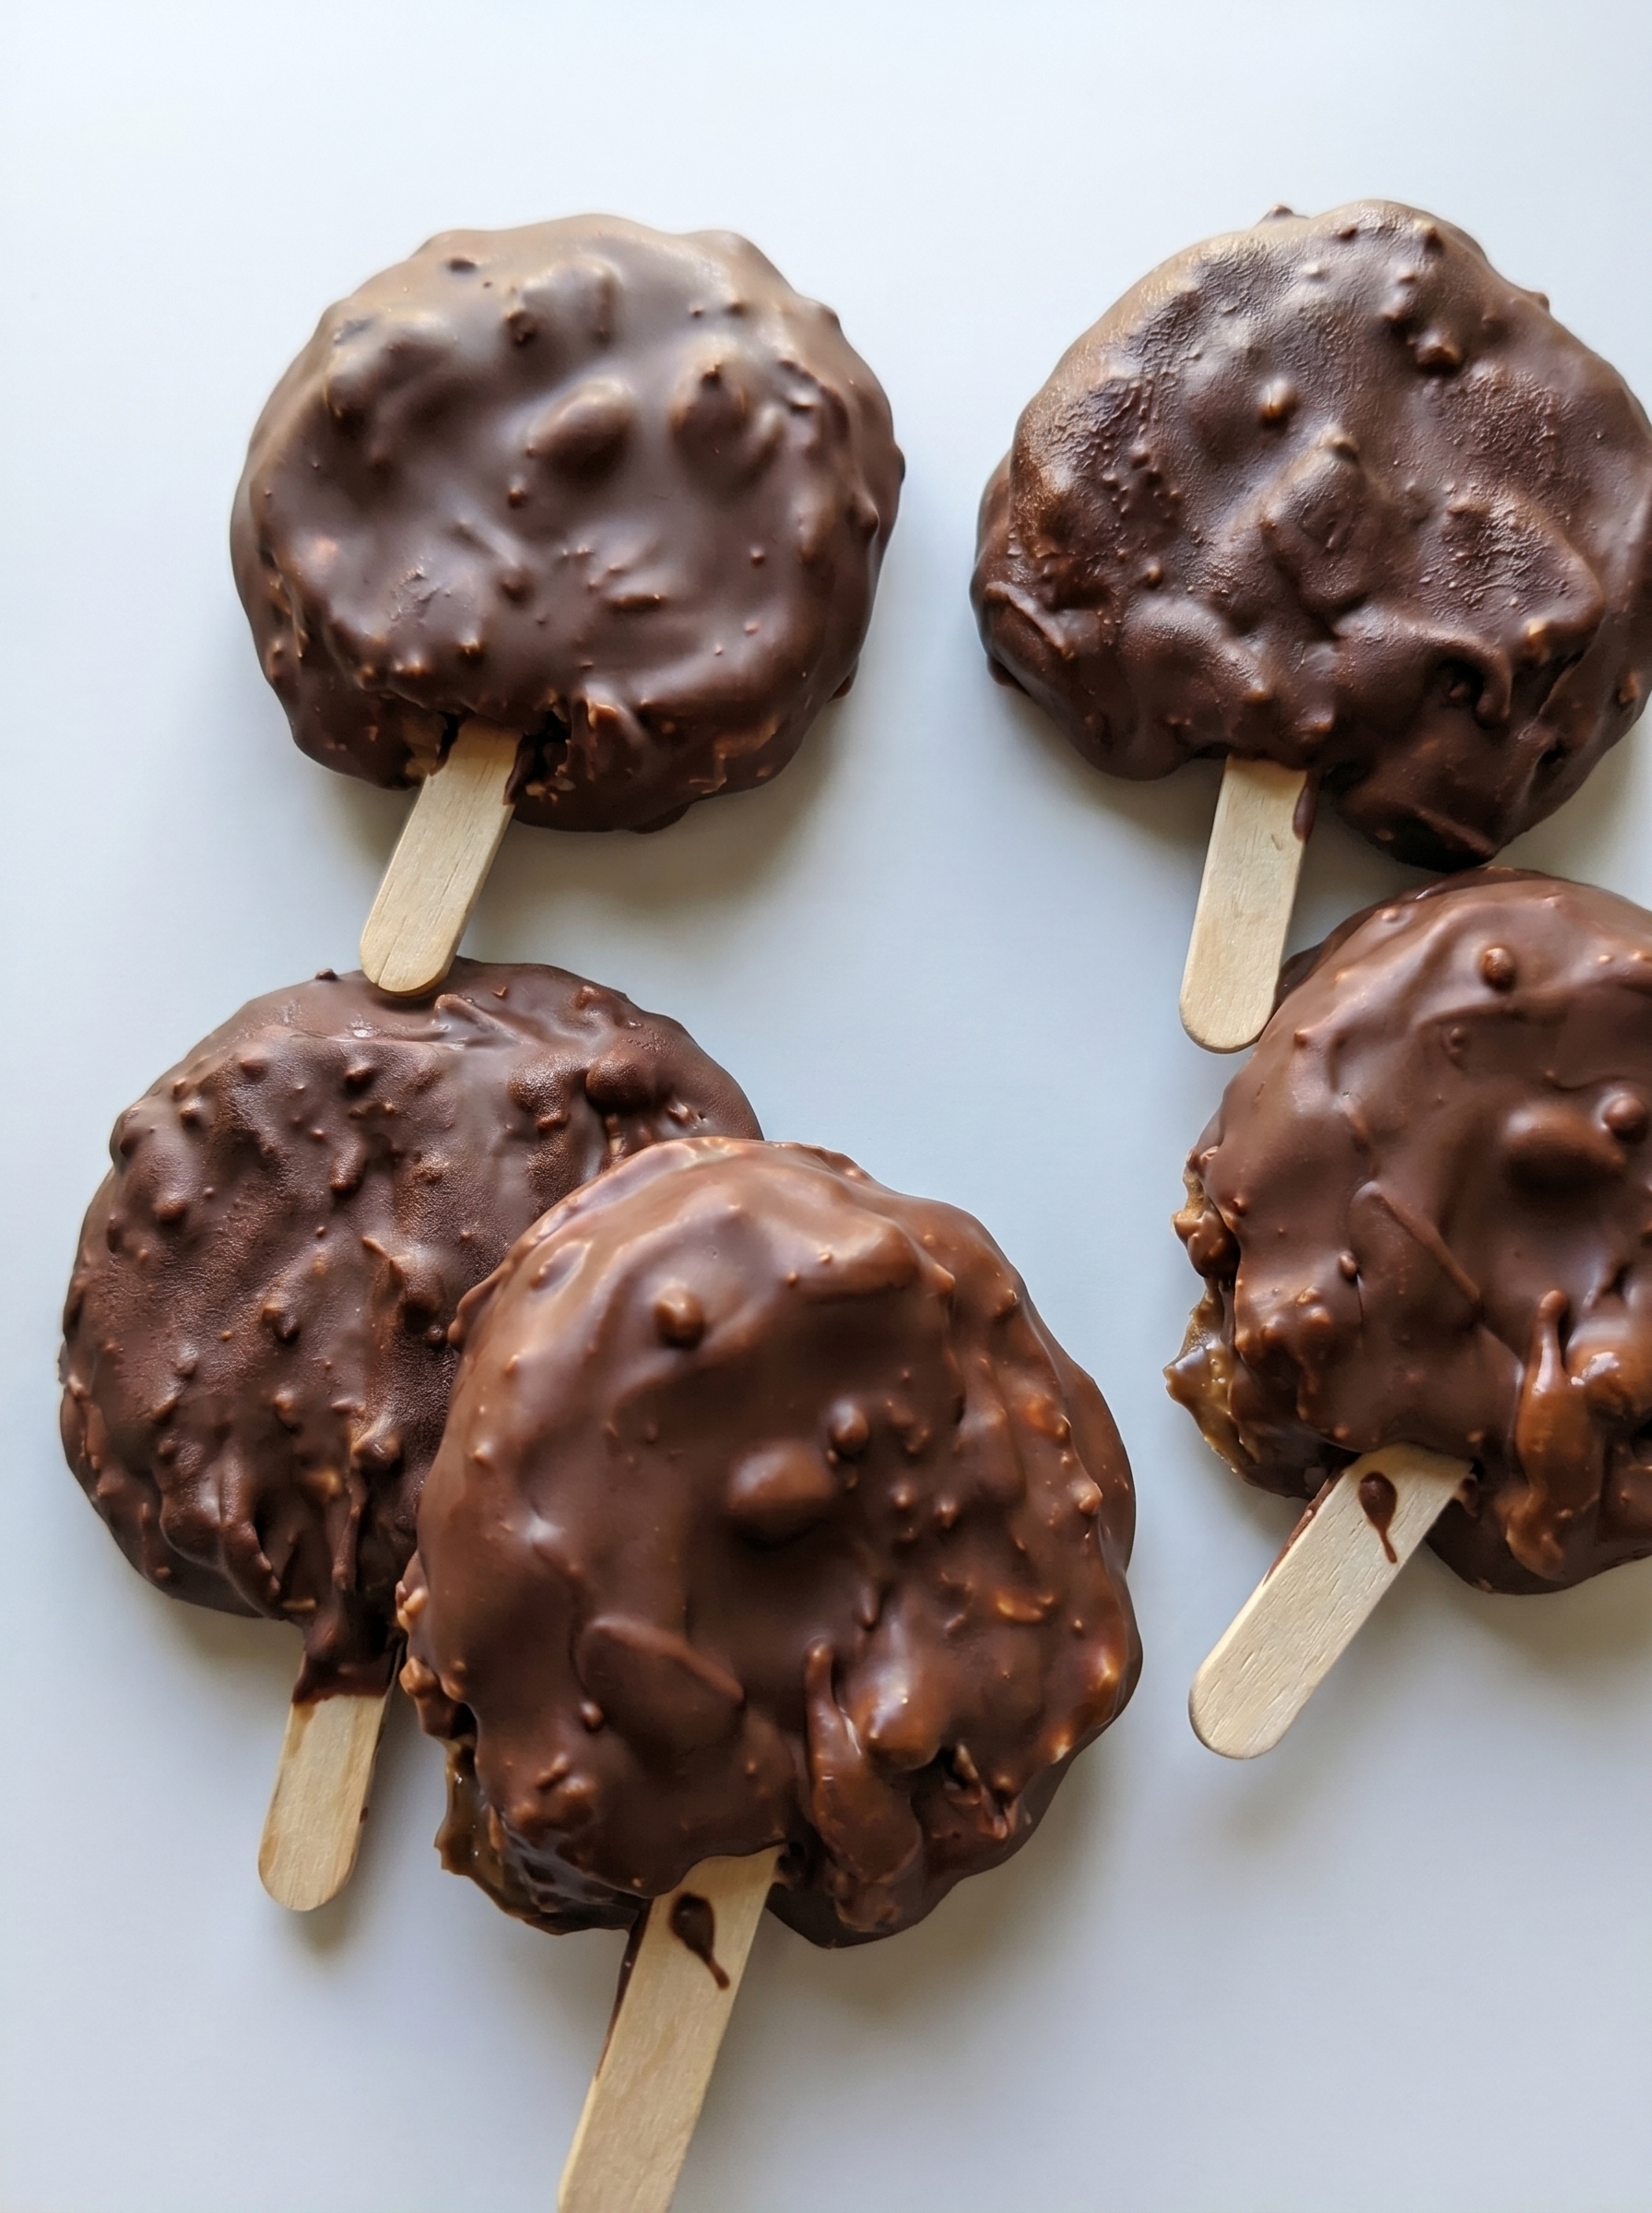
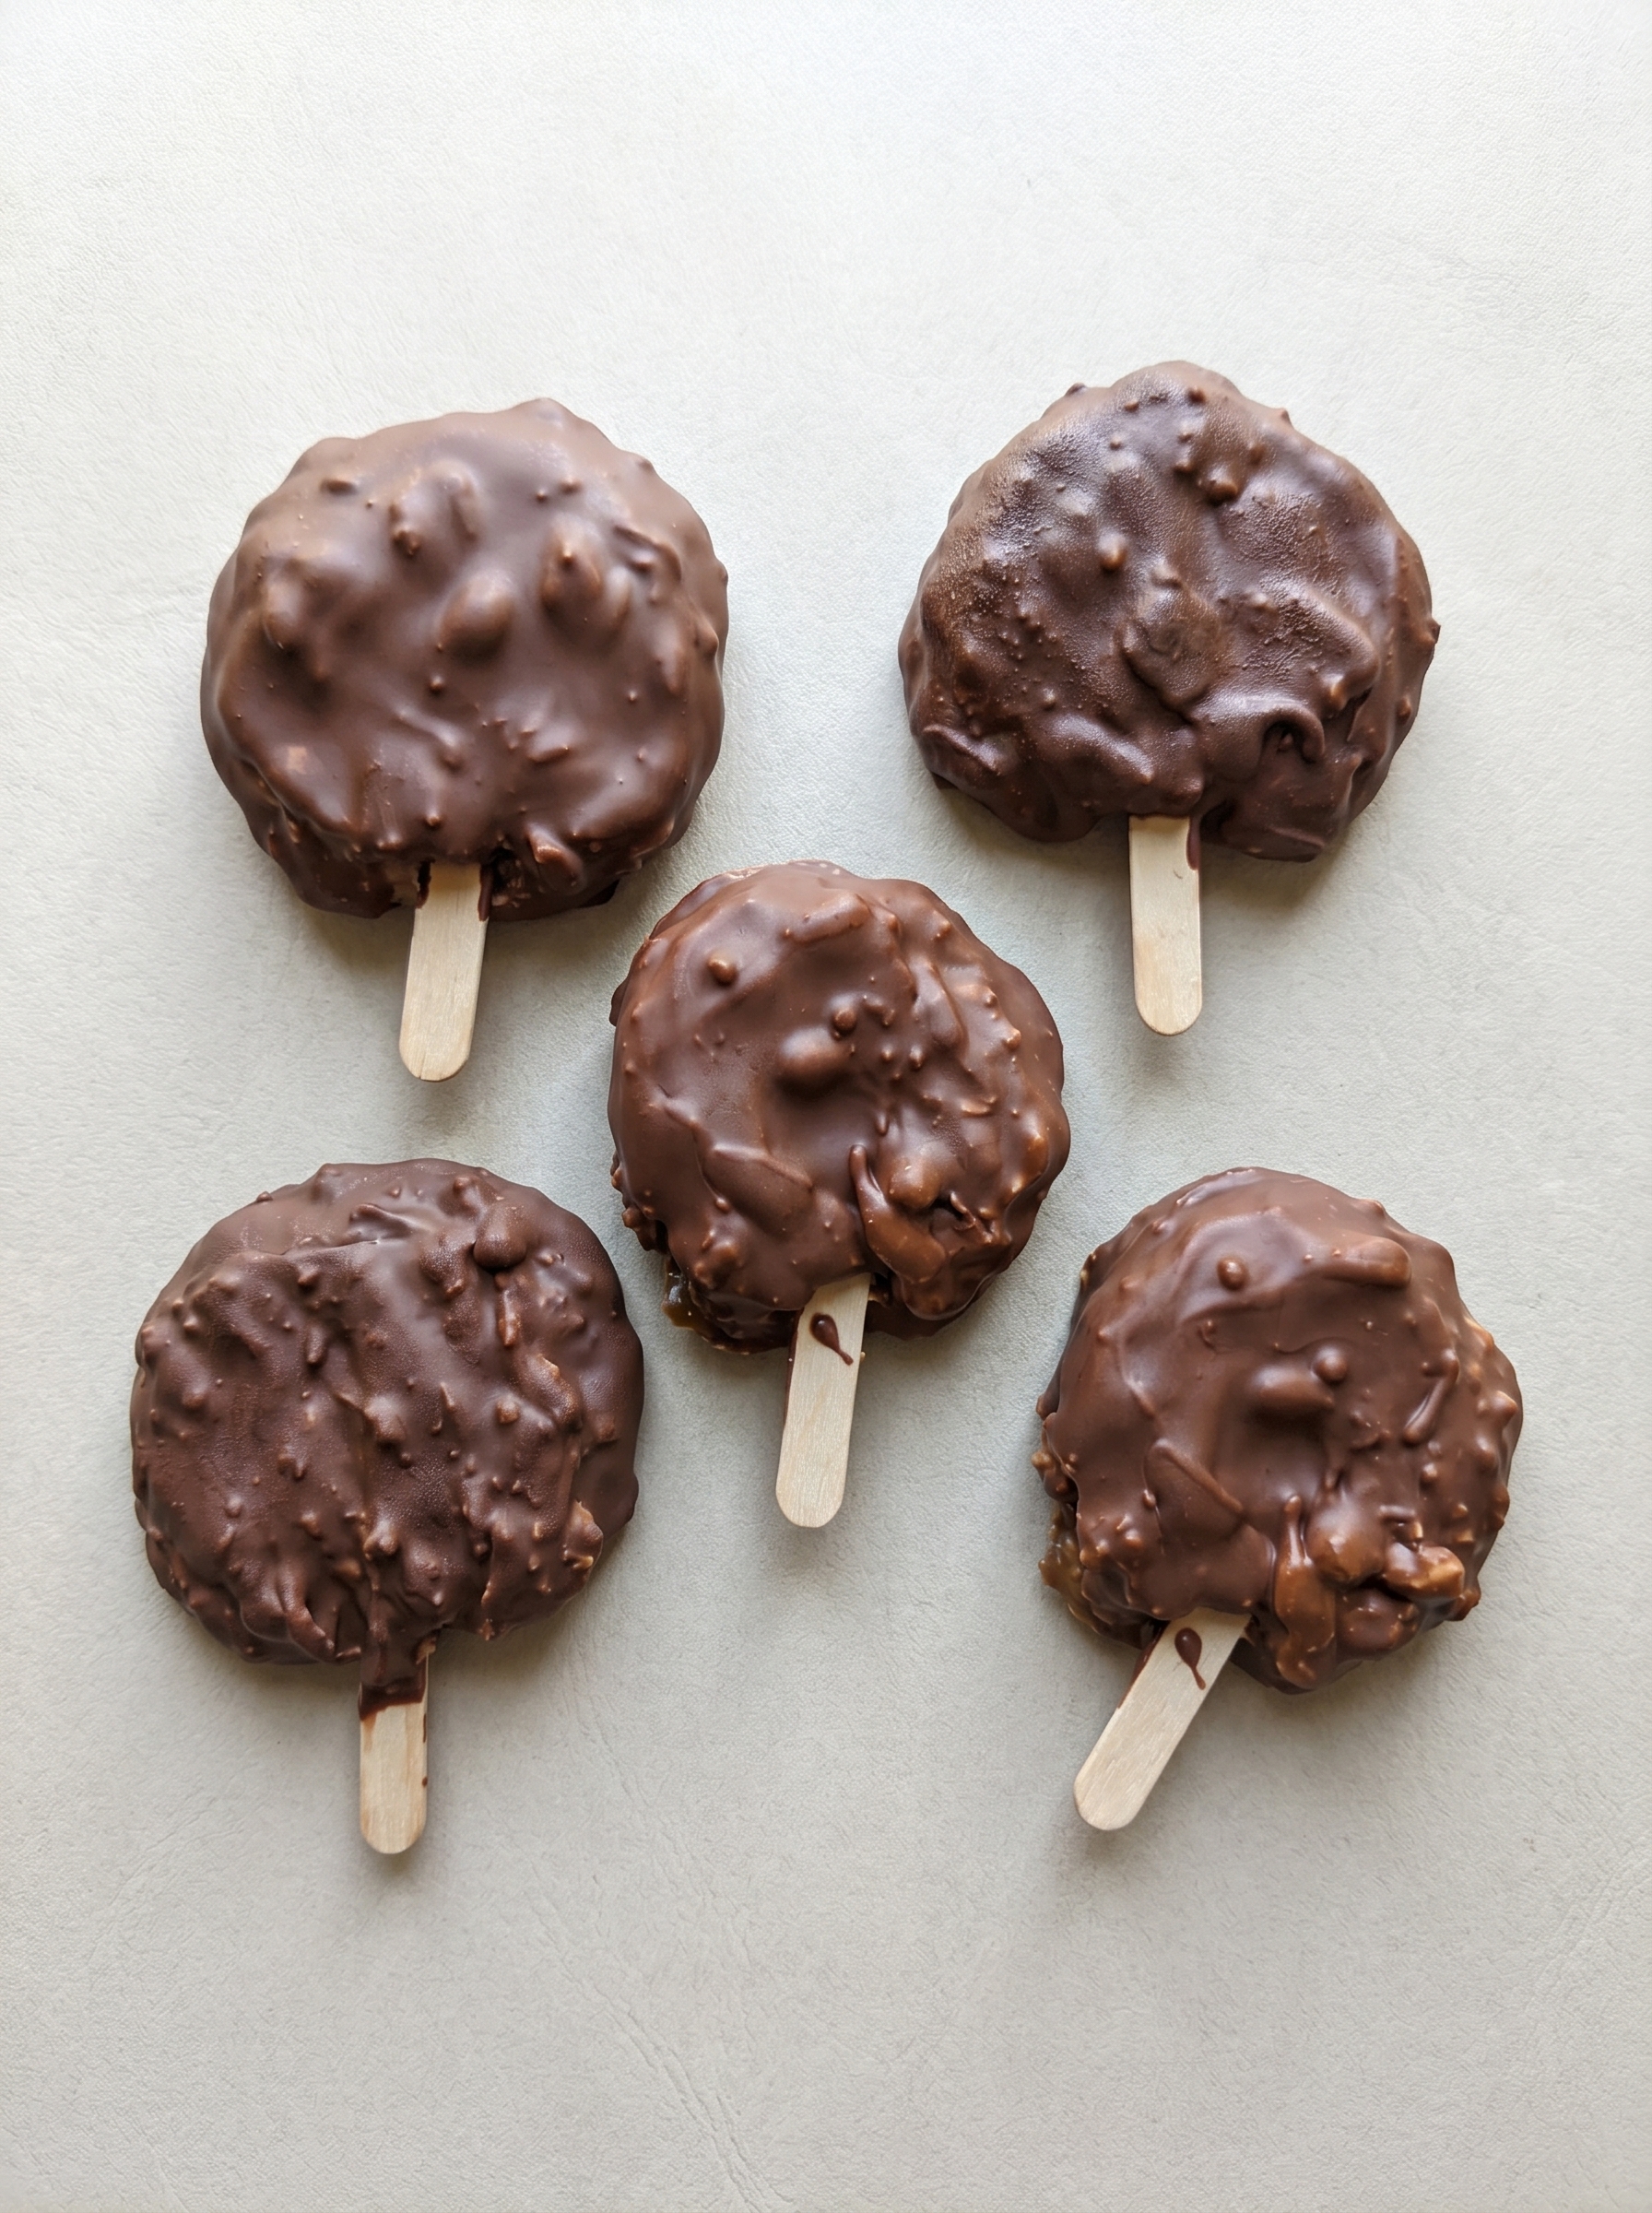
What makes these bars special is the balance of textures: the soft, slightly tangy frozen yogurt-peanut butter center contrasted with a crisp chocolate shell. They’re fast to assemble, require no baking, and the ingredients are pantry-friendly. I often keep the base mixture in the freezer to dip in chocolate later; it’s an effortless way to make a homemade treat for unexpected guests or weeknight dessert cravings. They’re one of those recipes that’s equally at home at a backyard barbecue or packed in a lunchbox as a cool afternoon snack.
Why You'll Love This Recipe
- Ready in about 5 minutes of active time — quick to mix, portion, and freeze so you can enjoy a treat the same day after a short chill.
- High-protein option: each bar is packed with over 15 grams of protein when using Greek yogurt, making it a satisfying post-workout snack or dessert.
- Uses pantry staples like peanut butter and chocolate chips; vanilla yogurt doubles as the creamy base so no specialty ingredients are required.
- No-bake and freezer-friendly: make a double batch and store extras for up to three months for easy grab-and-go treats.
- Customizable for allergies and preferences — swap dairy yogurt for a vegan alternative, use allergy-friendly nut butter, or choose dark chocolate for lower sugar.
- Crowd-pleaser for kids and adults; the familiar chocolate-peanut butter combination appeals across ages and tastes.
In my experience, these have been a hit at summer gatherings. My neighbor’s kids devoured them on a hot afternoon, and my partner claimed they were indistinguishable from store-bought versions. The first time I made them I learned that chilling the base slightly before scooping speeds up shaping and prevents melting when you press sticks in place.
Ingredients
- Yogurt (1 cup): I recommend full-fat Greek yogurt for the creamiest texture and the highest protein content; vanilla-flavored gives extra sweetness so you can skip added sugar. If you prefer, use plain yogurt and add sweetener, or try a plant-based vanilla yogurt if avoiding dairy.
- Peanut butter (1/4 cup): Use a smooth or creamy variety for easy folding and a uniform texture. Natural peanut butter with only peanuts (and salt) works well; if using a runny natural style, stir it well before measuring. Allergy-friendly seed butter swaps fine here too.
- Optional sweetener (2 tbsp): If your yogurt is unsweetened, add maple syrup, honey, or agave to taste. For the cleanest profile, powdered erythritol or a liquid monk fruit sweetener are good low-sugar options.
- Chocolate chips (1 cup): Use semi-sweet or dark chocolate chips for coating. If you prefer a milkier shell, choose milk chocolate. For dairy-free, choose vegan chocolate chips.
- Peanuts (2 tbsp, optional): Finely chopped for a little crunch on top. Toast them briefly for extra flavor if desired.
- Coconut oil (2 tsp, optional): Stirred into melted chocolate to make a smoother, shinier shell and speed up setting. Use sparingly; it also slightly thins the chocolate for easier dipping.
Instructions
Whip the base: In a medium mixing bowl, combine 1 cup yogurt, 1/4 cup peanut butter, and 2 tablespoons sweetener if using unsweetened yogurt. Whisk or use a hand mixer until completely smooth and slightly aerated — about 30 to 60 seconds. The aeration makes the frozen center lighter; if you overmix it becomes very soft, so stop when you see a glossy, uniform texture. Portion onto a tray: Line a baking sheet with parchment paper. Using a spoon or small ice cream scoop, drop tablespoon-sized blobs of the mixture onto the tray spaced about 1 inch apart. Press a popsicle stick or the handle of a small spoon into each blob and smooth the top with the back of the spoon for an even surface. If you like, press 6–8 mini chocolate chips into the tops for a hint of melting chocolate in the center. Freeze until firm: Place the tray in the freezer for 20 to 30 minutes until the centers are solid enough to handle. Freezing time varies by freezer; you want them firm but not icy — firm enough to dip without losing shape. Melt the chocolate: Carefully melt 1 cup chocolate chips in a microwave-safe bowl in 20-second bursts, stirring between each burst. When mostly melted, stir until smooth. If using, add 2 teaspoons coconut oil and stir until glossy. Alternatively, use a double boiler over simmering water to avoid scorching. Dip and set: Dip each frozen peanut butter piece into the melted chocolate, using a fork to lift and let excess chocolate drip off. Return to the parchment-lined tray and sprinkle with chopped peanuts if using. Freeze again for 10 minutes to set the shell, then transfer to an airtight container and keep frozen until serving.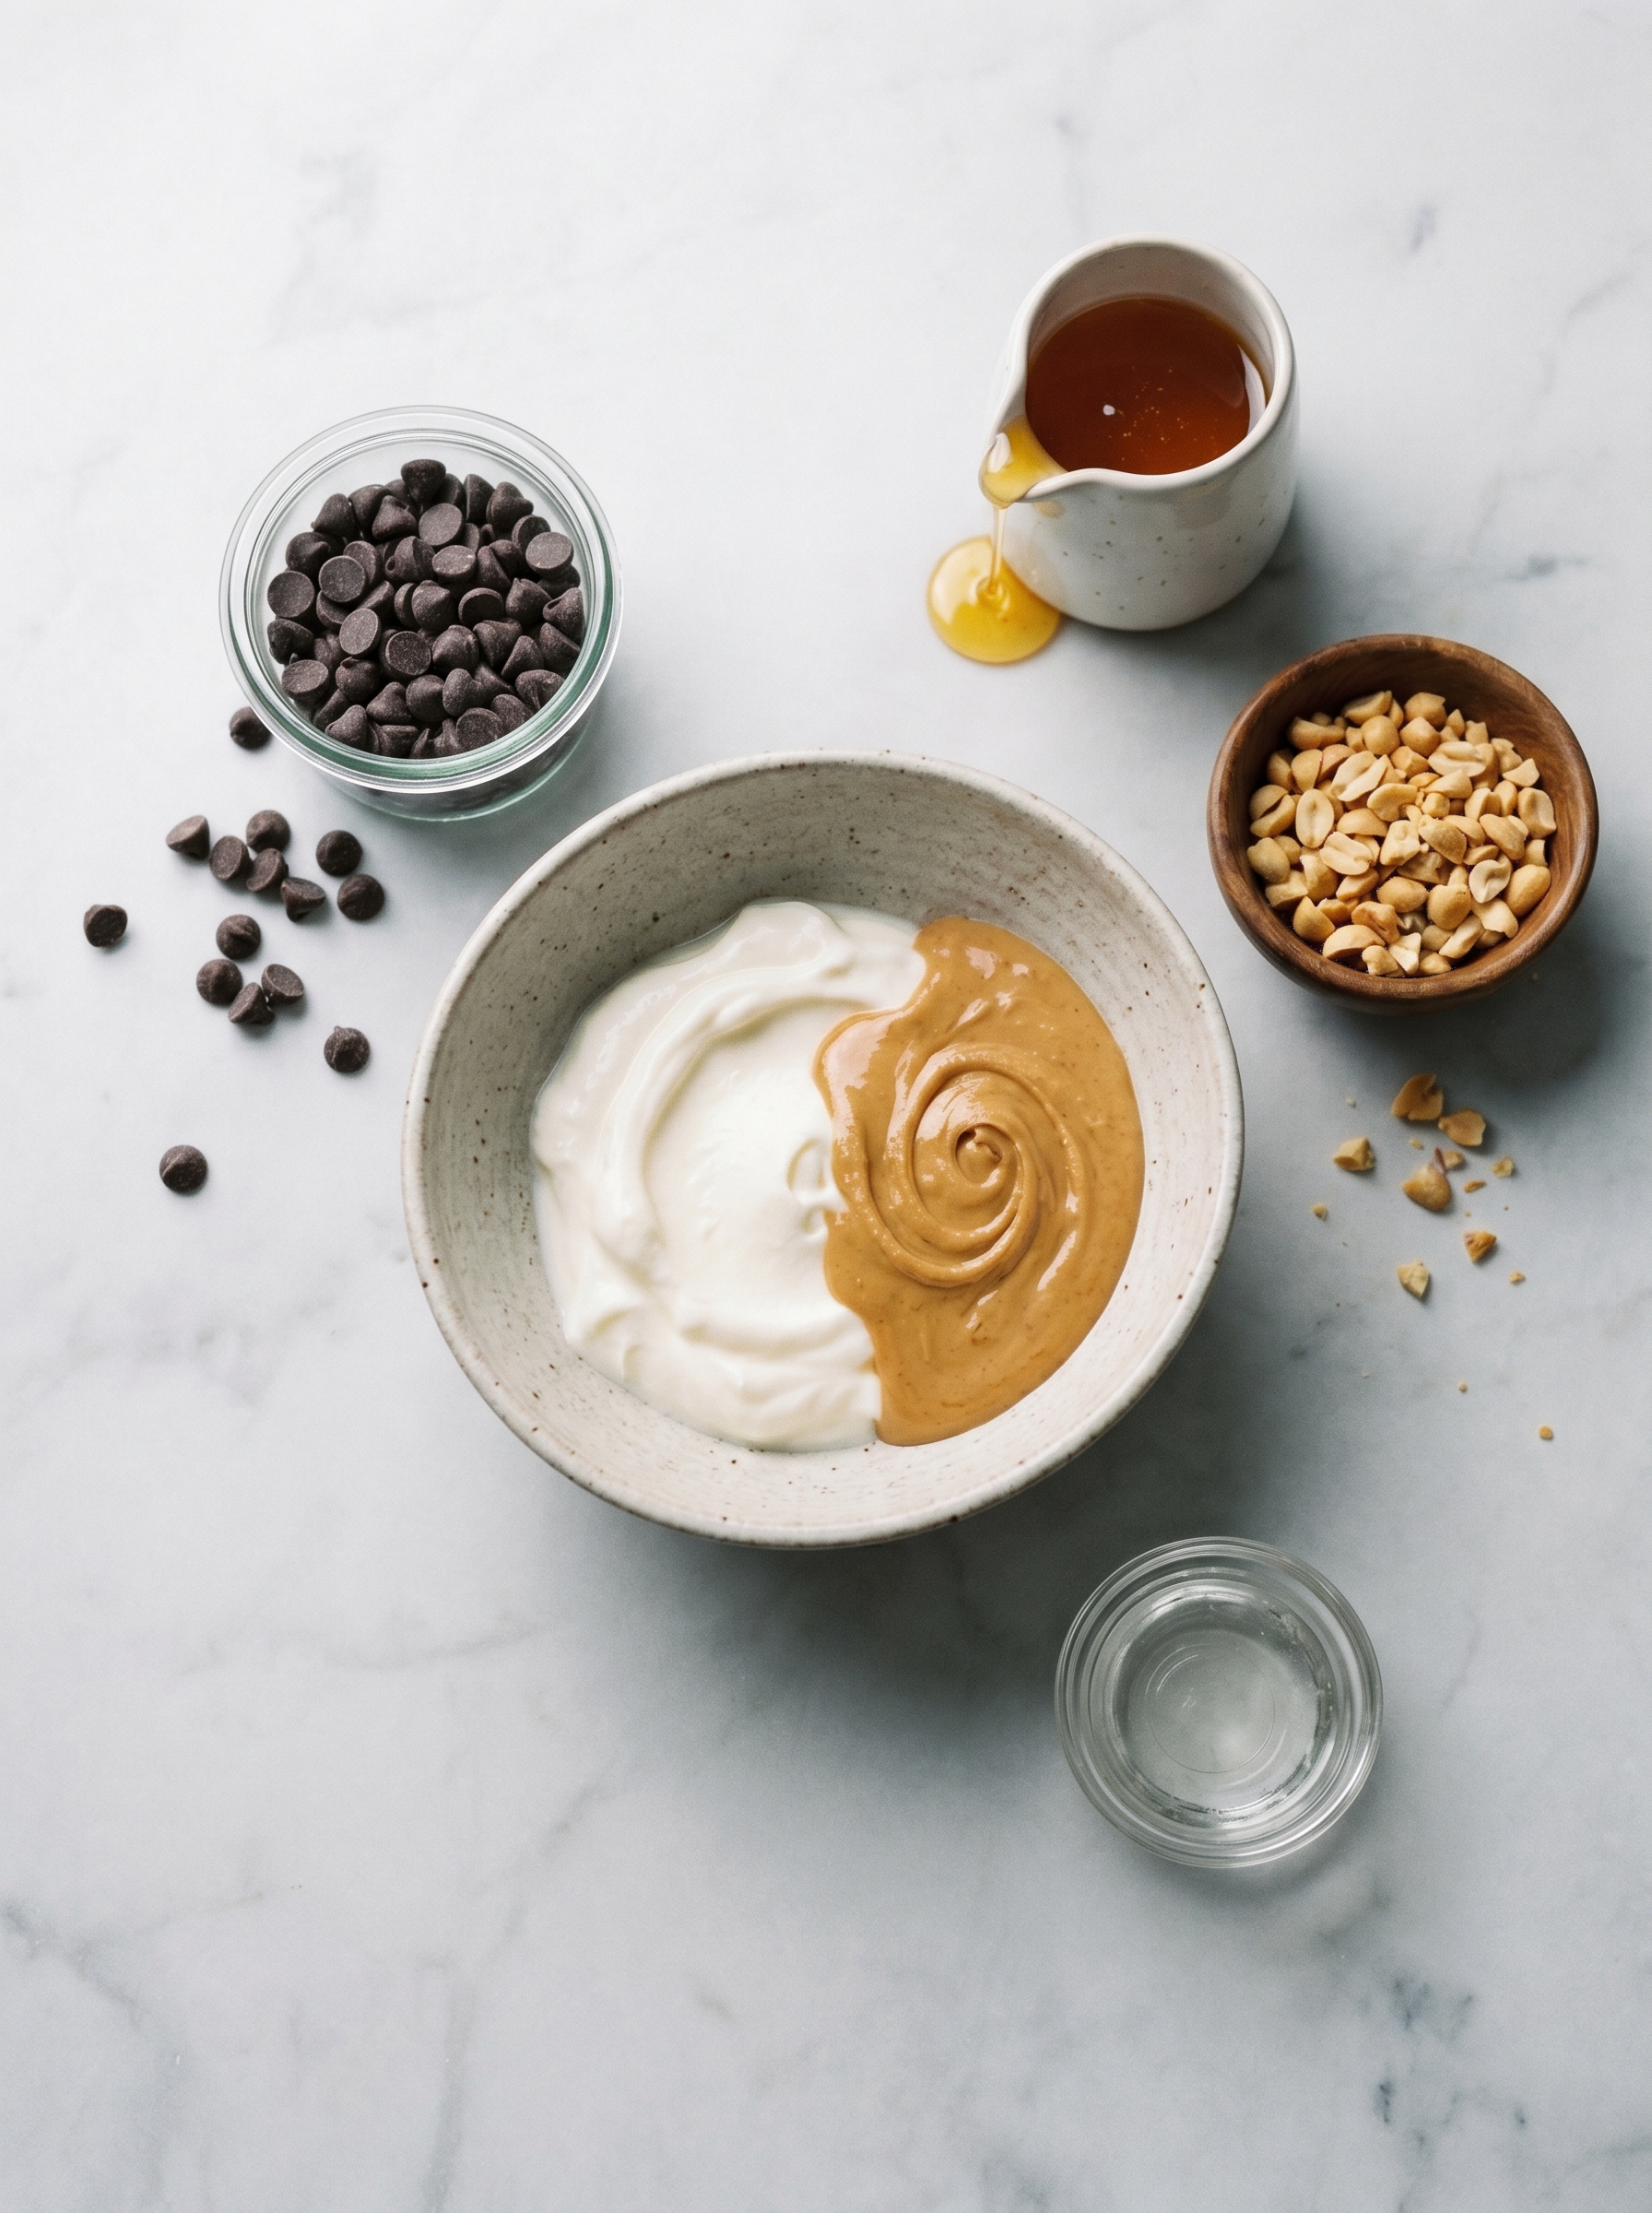
You Must Know
- High protein: Using Greek yogurt yields a protein-rich treat suitable as a post-workout snack.
- Freezer storage: Store in an airtight container with parchment between layers; they keep well for up to 3 months.
- Serving: For best texture, let sit at room temperature 2–3 minutes before eating so the shell cracks easily and the center softens slightly.
- Allergen note: Contains peanuts and possibly dairy; use allergy-friendly swaps to accommodate needs.
My favorite part is how portable and forgiving this method is. I once made a double batch for a pool party and forgot to chill them in time; a quick 20-minute blast in the freezer and the chocolate set beautifully. Guests loved the homemade vibe and the fact that it wasn’t overly sweet — the peanut butter shines through.
Storage Tips
Store bars in a single layer or separated with parchment in an airtight container in the freezer. They’ll keep best for up to three months; after that the texture starts to degrade and ice crystals may form. For weekend snacking, store up to two weeks in the freezer for peak flavor. When reheating or serving, move to the refrigerator for 10–15 minutes or let sit at room temperature for 2–3 minutes to avoid cracking the shell and to make biting easier. Avoid storing near strongly scented items to prevent flavor transfer.
Ingredient Substitutions
If you’re dairy-free, choose a high-protein soy or coconut-based yogurt and dairy-free chocolate chips. For nut allergies, swap peanut butter with sunflower seed butter or soy nut butter at a 1:1 ratio. To reduce sugar, use unsweetened cocoa for the coating and choose a sugar-free chocolate alternative or a dark chocolate with 70% cacao. If the base is too soft to freeze, reduce the yogurt slightly or add 1 to 2 tablespoons of powdered peanut butter to firm it up without changing flavor.
Serving Suggestions
Serve these frozen treats on a small platter with a sprinkle of sea salt or a few extra chopped peanuts for texture. They pair beautifully with fresh berries or a simple fruit salad for a summer dessert. For an elegant touch, plate two bars with a drizzle of warmed peanut butter-chocolate sauce and a mint leaf. They’re also great as a lighter dessert option after a heavy meal.
Cultural Background
This homemade version pays homage to the iconic chocolate-coated peanut bar popularized in American fast-food and ice cream culture. The classic combination of chocolate and peanut butter has roots in mid-20th-century American sweets, evolving into variations like ice cream bars and candy bars. This version leans into modern priorities: higher protein, cleaner labels, and easy customization.
Seasonal Adaptations
In winter, swap vanilla yogurt for a cinnamon or pumpkin-spice flavored yogurt and use dark chocolate for a richer shell. For summer, add a few chopped frozen bananas into the base for a creamier tropical twist or stir in finely chopped dried coconut for texture. Holiday versions can include crushed candy cane sprinkled on top or chopped toasted pecans instead of peanuts.
Meal Prep Tips
Make a double batch and layer with parchment in an airtight container for quick grab-and-go snacks. Portion the base into silicone mini-muffin liners for uniform size and easy removal. If dipping many bars, keep the melted chocolate warm by placing the bowl over a pan of barely simmering water to prevent rehardening between dips.
These bars are a joyful little project that reward minimal effort with maximum satisfaction. Whether you’re feeding kids, entertaining friends, or simply treating yourself, they’re adaptable, quick, and reliably delicious. Try them once and you’ll find yourself mixing and freezing batches for all kinds of occasions.
Pro Tips
Chill the base slightly before portioning to make shaping easier and reduce melting when pressing sticks.
Use a fork to dip and tap excess chocolate off to create an even shell without drips.
Freeze the dipped bars on parchment and transfer to a container only after the shell is fully set to avoid sticking.
This nourishing healthy chocolate peanut butter buster bars recipe is sure to be a staple in your kitchen. Enjoy every moist, high protein slice — it is perfect for breakfast or as a wholesome snack any time.
FAQs about Recipes
Can I make these dairy-free?
Yes. Use a plant-based yogurt and vegan chocolate chips to make them dairy-free.
How long do they keep?
Store in an airtight container in the freezer for up to 3 months; separate layers with parchment.
Tags
Healthy Chocolate Peanut Butter Buster Bars
This Healthy Chocolate Peanut Butter Buster Bars recipe makes perfectly juicy, tender, and flavorful steak every time! Serve with potatoes and a side salad for an unforgettable dinner in under 30 minutes.
Ingredients
Base
Coating
Toppings (optional)
Instructions
Make the creamy base
Whisk 1 cup yogurt, 1/4 cup peanut butter, and 2 tablespoons sweetener (if using) until smooth and slightly aerated. Stop when glossy and uniform to avoid overmixing.
Portion and insert sticks
Spoon tablespoon-sized blobs onto parchment-lined tray, press a popsicle stick or spoon handle into each, and smooth tops. Optionally press a few mini chocolate chips into each.
Initial freeze
Freeze the tray for 20 to 30 minutes until firm enough to handle without losing shape.
Melt chocolate
Melt 1 cup chocolate chips in 20-second microwaving intervals, stirring between bursts. Stir in 2 teaspoons coconut oil if using to thin and shine the chocolate.
Dip and set
Dip frozen centers into melted chocolate, return to parchment, sprinkle with chopped peanuts if desired, and freeze 10 minutes to set the shell.
Last Step: Please leave a rating and comment letting us know how you liked this recipe! This helps our business to thrive and continue providing free, high-quality recipes for you.
Nutrition
Did You Make This?
Leave a comment & rating below or tag
@royalrecipe on social media!
Categories:
You might also like...

Spicy Chicken and Jalapeño Thin Crust Pizza
Easy homemade thin-crust three-cheese spicy chicken and jalapeño pie — a flavor-packed pizza with a satisfying kick, perfect for pizza night or game day.

Creamy Pesto BLT Pasta Salad
A bright, creamy BLT pasta salad tossed with basil pesto, fresh greens, cherry tomatoes, and crisp bacon—perfect for warm-weather gatherings and meal prep.

Bang Bang Shrimp Pasta
Tender sautéed shrimp tossed with spaghetti and a creamy sweet-spicy bang bang sauce—ready in under 30 minutes for a weeknight favorite.
Did You Make This?
Leave a comment & rating below or tag @royalrecipe on social media!
Rate This Recipe
Share This Recipe
Enjoyed this recipe? Share it with friends and family, and don't forget to leave a review!
Comments (1)
This recipe looks amazing! Can't wait to try it.
Comments are stored locally in your browser. Server comments are displayed alongside your local comments.
Hi, I'm Amara!
What's Popular

30-Minute Meals!
Join to receive our email series which contains a round-up of some of our quick and easy family favorite recipes.