30-MINUTE MEALS! Get the email series now
Royal Recipe

Crispy Chicken Pakora

5 from 1 vote
1 Comments
Amara
By: AmaraUpdated: Jun 13, 2026
This post may contain affiliate links. Please read our disclosure policy.

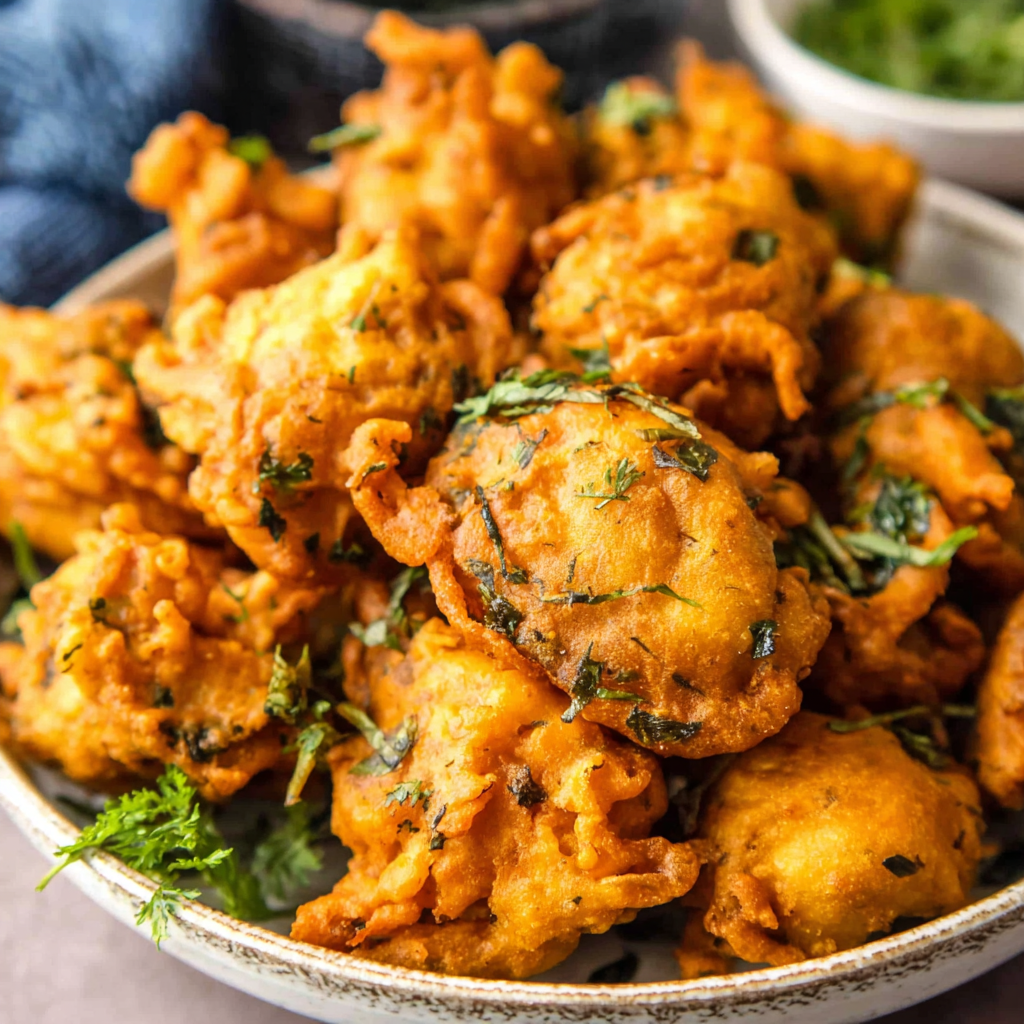
Crispy, golden-brown chicken pakoras — an easy, authentic Indian snack that stays crunchy and full of flavor. Perfect for parties, tea time, or game day.

Crispy Chicken Pakora
This crispy chicken pakora has been my go-to party starter for years. I first learned this version from a neighbor who taught me how the combination of gram flour and rice flour makes the coating snap and hold on to juicy chicken. I discovered it during a rainy monsoon evening when a sudden knock on the door brought friends over; what started as a test batch turned into the fastest-vanishing plate at the table. The contrast between the hot, spiced exterior and the tender chicken inside is what keeps everyone coming back for more. The recipe matters because it balances texture and flavor without complicated techniques. The batter clings to small bite-sized pieces of boneless chicken and fries up light and crunchy, not greasy. The curry leaves are an aromatic detail that elevates the flavor profile in a way that’s unmistakably Indian while staying approachable for anyone trying it for the first time. I love serving these with a simple green chutney and lemon wedges; watching people squeeze lemon over the warm pakoras and take that first crisp bite is one of my favorite hosting moments.

Why You'll Love This Recipe

  • Ready quickly: active prep is about 10 minutes and frying takes roughly 15 minutes, so you can have hot pakoras on the table in under 30 minutes for last-minute guests.
  • Pantry-friendly: uses gram flour (besan), rice flour, and common spices that keep well in the pantry and can be mixed ahead of time.
  • Stays crispy: the rice flour and a bit of corn starch create a batter that stays crunchy longer than plain gram-flour coatings.
  • Flexible portions: makes about 25 small pieces, perfect for a 6-8 person gathering or easily doubled for a crowd.
  • Gluten-free option: uses naturally gluten-free flours; just ensure your spices and flours are certified gluten-free if needed.

Personally, I find that the dry-crushed curry leaves are the secret confetti inside the batter — a small action with a big payoff. My family often requests these for movie nights and our Diwali get-togethers; even guests who prefer milder foods enjoy them because you can control the chili level easily.

Ingredients

  • Chicken (1.1 lb / 500 g boneless thighs or breasts): Use boneless thigh for a slightly juicier result; breast works fine if you avoid overcooking. Cut into 1-inch pieces so they cook evenly. I prefer thigh pieces for flavor, but breast is leaner.
  • Besan (gram flour) 1/4 cup (4 tablespoons): This is the backbone of the coating. Choose a finely milled besan; it binds well and gives a nutty edge. Popular brands from India or specialty stores both work.
  • Rice flour 3 tablespoons: Rice flour contributes crispness. Do not substitute with wheat flour if you want the same crunch and gluten-free result.
  • Corn starch 1 tablespoon: Adds a delicate brittle quality to the crust. Mix with the flours for a consistent coating.
  • Chili powder 3/4 tablespoon (about 2 1/4 teaspoons): Adjust to taste. Use Kashmiri chili powder for vibrant color with moderate heat, or a standard cayenne-based chili powder for more kick.
  • Garam masala 1/2 tablespoon (1 1/2 teaspoons): Adds warmth and rounded spice notes. Freshly ground is best.
  • Cumin 1/2 tablespoon (1 1/2 teaspoons) & Coriander powder 1/2 tablespoon (1 1/2 teaspoons): These give an earthy backbone to the spice mix.
  • Curry leaves 1/4 cup (dried or fresh): If using dried, crush lightly between your palms to release aroma; fresh leaves can be finely chopped. They lend a fragrant, citrusy, savory note that is signature to this snack.
  • Egg 1 large: Helps the dry ingredients adhere to the chicken and contributes to browning.
  • Ginger-garlic paste 3/4 tablespoon (about 2 1/4 teaspoons): Freshly made paste punches up freshness but store-bought paste is fine in a pinch.
  • Salt: Season to taste; start with about 1 teaspoon and adjust when mixing the chicken.
  • Oil for deep frying: Neutral oil with a high smoke point such as vegetable or canola oil. You need roughly 2 inches of oil in the wok.

Instructions

Prepare the chicken: Trim fat and cut the boneless chicken into roughly 1-inch pieces so they cook in about the same time. Pat pieces dry with kitchen paper; removing surface moisture helps the batter cling and prevents oil splatter. Make the wet base: In a large bowl, crack the egg and break it lightly. Add about 1 teaspoon salt and the ginger-garlic paste. Whisk gently until combined but not frothy; you want a sticky base for the spices and flours to adhere. Add the spices and curry leaves: Mix in the chili powder, cumin, coriander, and garam masala. Crush the dried curry leaves between your palms or finely chop fresh leaves and stir them into the egg-spice mix. Add the chicken to this mixture and toss gently with a fork so each piece gets a light coating. Combine dry flours: In a separate bowl, whisk together the gram flour, rice flour, and corn starch until uniformly blended. This prevents lumps and ensures even crisping. Batter the chicken: Add the dry flour mix to the bowl with chicken. Using your fingers, gently fold and press the flour into the chicken pieces so they are well coated. The batter should be thick and clinging; if it feels too dry, add 1 to 2 tablespoons of cold water, a little at a time, until you reach a pasty, non-runny consistency. Heat the oil: Pour oil into a wok or deep frying pan to a depth of about 2 inches. Heat over medium-high heat until the oil registers about 350–360°F. If you don’t have a thermometer, drop a small bit of batter into the oil — if it bubbles and rises to the surface immediately, the oil is ready. Fry in batches: Gently add the pieces one at a time to the hot oil, avoiding overcrowding. Fry for about 5–6 minutes per batch, turning occasionally, until the exterior is deeply golden and crisp and the chicken is cooked through. Timing will vary slightly with piece size; an instant-read thermometer in the largest piece should read 165°F. Drain and finish: Remove pakoras with a slotted spoon and drain on paper towels. While still hot, squeeze a little lemon over them and sprinkle extra crushed curry leaves if desired. Serve immediately with chutney or ketchup. Crispy chicken pakoras frying in a wok

You Must Know

  • These bites are high in protein and relatively low in carbs when portioned small; they freeze well for up to three months when flash-frozen on a tray and stored in a freezer-safe bag.
  • Always test oil temperature before frying: oil that is too cool will cause soggy, greasy pieces; too hot and the exterior will brown before the inside cooks.
  • Use rice flour and a small amount of corn starch for the crispiest shell; skipping one of these will change the texture noticeably.
  • Leftovers are best reheated in a preheated oven or air fryer at 350°F for 6–8 minutes to restore crunch.

My favorite part of this preparation is the flexibility: you can make the batter hours ahead and refrigerate it, or cut the chicken and mix it with spices the day before to save time. Family members often help crush the curry leaves while we chat, turning cooking into a communal ritual.

Plated chicken pakoras with lemon wedges

Storage Tips

Store cooled pakoras in an airtight container in the refrigerator for up to 2 days. To freeze, spread a single layer on a baking sheet and freeze until firm, then transfer to a resealable freezer bag for up to 3 months. Reheat frozen pieces in a 350°F oven or air fryer for 8–10 minutes, turning once, until heated through and crisp. Avoid microwaving as it softens the coating. When refrigerating, place a paper towel between layers to absorb any residual oil and maintain texture.

Ingredient Substitutions

If you cannot find besan, you can use chickpea flour labeled as such — it is the same product with different labeling. For a gluten-containing yet similar texture, a fine white rice flour plus a tablespoon of all-purpose flour can work but will change the crispness. Omit the egg for an egg-free version: mix 2 tablespoons of yogurt or aquafaba as a binder, but expect slight differences in browning and mouthfeel. For a milder version, reduce chili powder to 1 teaspoon and add a pinch of smoked paprika for color.

Serving Suggestions

Serve hot with coriander-mint chutney, tamarind dip, or a simple lemon wedge. Pair with a cooling cucumber raita or a light salad for contrast. For a party platter, arrange on a bed of shredded lettuce, garnish with extra curry leaves and lemon slices, and provide toothpicks for easy serving. These also pair wonderfully with a cold beer or a masala chai depending on the occasion.

Cultural Background

Pakora is a classic South Asian fried snack with countless regional variations across India and Pakistan. Traditionally made with vegetables or paneer, chicken versions are a popular non-vegetarian twist that became common as cooks adapted the technique for proteins. Curry leaves, frequent in South Indian cuisine, introduce a distinct aroma that differentiates southern pakoras from northern styles that rely more on fenugreek or carom seeds.

Seasonal Adaptations

In winter, add a pinch of ground black pepper and garam masala for warming depth. During summer, lighten the heat with extra lemon and fresh mint in the chutney. For festive occasions like Diwali, prepare a double batch and keep warm in a low oven set to 200°F for a short period, rotating trays to prevent steaming. You can also add minced green chilies and fresh cilantro to the batter for a bright seasonal variation.

Meal Prep Tips

Prep the chicken and spice-batter separately the day before: store the spiced egg mix in the fridge and bring to room temperature before adding flours. Mix the dry flour blend ahead and keep in an airtight jar. For quick assembly, keep chicken pieces in a shallow container, pour measured flour over them and toss to coat when ready to fry. This approach saves time without compromising texture.

These pakoras are a celebration of texture and aroma — simple to make, endlessly adaptable, and always a crowd-pleaser. Try them once and you’ll quickly find yourself tweaking the spice blend to suit every gathering. Happy frying and enjoy sharing this crunchy favorite with friends and family.

Pro Tips

  • Pat chicken pieces dry before coating to help the batter adhere and reduce oil splatter.

  • Test oil temperature with a tiny drop of batter; if it bubbles and rises, the oil is ready.

  • Do not overcrowd the pan; fry in small batches to maintain consistent temperature and crispness.

  • Use rice flour plus a small amount of corn starch for a crisp, long-lasting exterior.

  • Reheat in a preheated oven or air fryer rather than a microwave to keep the crust crunchy.

This nourishing crispy chicken pakora recipe is sure to be a staple in your kitchen. Enjoy every moist, high protein slice — it is perfect for breakfast or as a wholesome snack any time.

FAQs about Recipes

How long do pakoras keep?

Store cooled pakoras in an airtight container in the refrigerator for up to 2 days or freeze for up to 3 months. Reheat in an oven or air fryer to restore crispness.

How do I know the oil is hot enough?

Check oil by dropping a small bit of batter into the oil; it should sizzle and rise immediately. Use a thermometer if you have one; 350–360°F is ideal.

Tags

Starters & BitesAppetizersIndian CuisineGluten FreeChickenSnackParty Food
No ratings yet

Crispy Chicken Pakora

This Crispy Chicken Pakora recipe makes perfectly juicy, tender, and flavorful steak every time! Serve with potatoes and a side salad for an unforgettable dinner in under 30 minutes.

Servings: 25 steaks
Crispy Chicken Pakora
Prep:10 minutes
Cook:15 minutes
Rest Time:10 mins
Total:25 minutes

Ingredients

Protein

Flours & Binders

Spices & Aromatics

For Frying

Instructions

1

Cut and dry the chicken

Trim any excess fat and cut the chicken into about 1-inch pieces. Pat dry with paper towels to remove surface moisture so the batter adheres properly.

2

Prepare the wet base

In a large bowl, beat the egg lightly and add salt and ginger-garlic paste. Mix in the ground spices and crushed curry leaves, then add the chicken and toss to coat.

3

Mix dry flours

Whisk together gram flour, rice flour, and corn starch in a separate bowl until lump-free for an even coating.

4

Coat the chicken

Combine the dry flour mix with the chicken and press the flour into each piece using your fingers. Add 1-2 tablespoons water only if the batter is too dry; it should be thick and pasty.

5

Heat oil and test temperature

Bring oil to roughly 350–360°F in a wok. Test with a small drop of batter; it should bubble and rise immediately. Adjust heat to maintain this temperature while frying.

6

Fry in batches

Add pieces carefully, do not overcrowd, and fry each batch for about 5–6 minutes until golden brown and cooked through. Drain on paper towels.

7

Serve

While hot, drizzle with lemon juice and sprinkle extra crushed curry leaves. Serve with chutney or lemon wedges.

Last Step: Please leave a rating and comment letting us know how you liked this recipe! This helps our business to thrive and continue providing free, high-quality recipes for you.

Nutrition

Calories: 83kcal | Carbohydrates: 2g | Protein:
3g | Fat: 7g | Saturated Fat: 2g |
Polyunsaturated Fat: 1g | Monounsaturated Fat:
3g | Trans Fat: 1g | Cholesterol: 253mg | Sodium:
0mg | Potassium: 953mg | Fiber: 0g | Sugar:
0g | Vitamin A: 577IU | Vitamin C: 3mg | Calcium:
47mg | Iron: 6mg

Did You Make This?

Leave a comment & rating below or tag
@royalrecipe on social media!

Crispy Chicken Pakora

Categories:

Crispy Chicken Pakora

Did You Make This?

Leave a comment & rating below or tag @royalrecipe on social media!

Rate This Recipe

Share This Recipe

Enjoyed this recipe? Share it with friends and family, and don't forget to leave a review!

Comments (1)

Leave a Comment

0/1000 characters
Food Lover
1 day ago

This recipe looks amazing! Can't wait to try it.

Rating:

Comments are stored locally in your browser. Server comments are displayed alongside your local comments.

Family Photo

Hi, I'm Amara!

Chef and recipe creator specializing in delicious Starters & Bites cooking. Passionate about sharing easy-to-follow recipes that bring families together around the dinner table.

30-Minute Meals!

Join to receive our email series which contains a round-up of some of our quick and easy family favorite recipes.